Table of Contents
 How many marketplaces are you now selling goods on? One? Four? Ten? Do they include a Facebook Shop page? Well, they should. Here is why selling on FB makes a lot of sense.
All companies, big and small, know about social media perks but don’t know how to use them successfully. So even when you have a promising Amazon account with optimized listings and exceptional sales results, you must consider working on other avenues like Facebook. It will help you extend your reach and draw more clients.
This guide will focus on a FB store specifically. So keep on reading to learn how to set up a Facebook Store page and get on your journey to selling on the platform!
What Is a Facebook Shop?

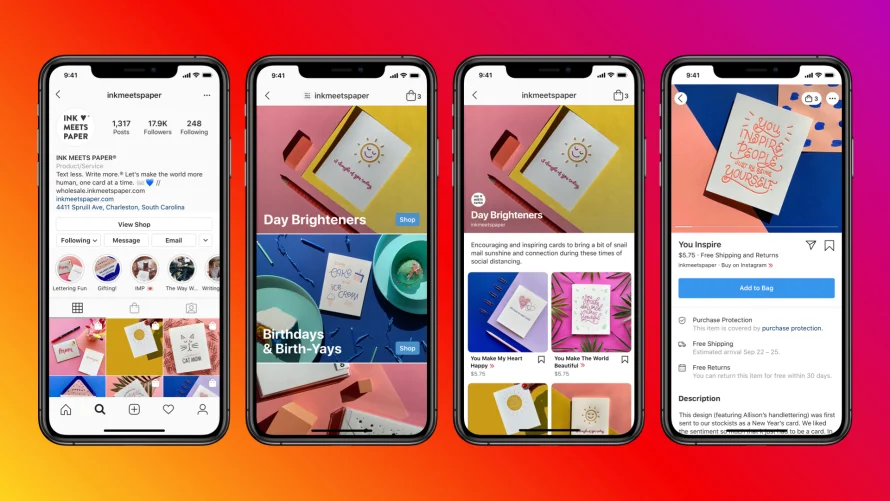
A Facebook Store is an online shop available on Instagram and Facebook and allows clients to browse and make purchases directly on social media or by clicking the link to a brand’s website to finish the sale.
FB and Instagram visitors can find companies on Facebook Shop with their FB page or an Instagram account.
What is cool about this feature is that it’s discoverable through ads or organically, meaning there are many opportunities for social media marketers to grow businesses for different channels.
What Are the Facebook Shop Fees?
To sell on Facebook, merchants need to pay a:
- Transaction commission of 5% per order
- Selling commission of $0.40 (including sales price, delivery fees, and taxes)
- Chargeback commission of $20 per chargeback. (Now, there’s no selling fee on FB Shop)
Why Set Up Facebook Shops?
Companies of any size can join the FB Shops train and take advantage of some benefits. Below are a few of our favorites.
Easy and smooth checkout
For clients of direct-to-consumer companies, Facebook Shop provides a one-stop buying experience. They can contact your company via FB Messenger, be directed to the relevant product, and then buy an item straight on Facebook.
It delivers a seamless customer experience. Directing a shopper to an external site, where it is simpler for them to get distracted and choose not to purchase, is unnecessary.
Simple cataloging
You know how difficult cataloging might be if your brand has an Internet shop. However, editing and saving information about products is much simpler with Facebook Shops.
Proceed to your Commerce Manager if you need to change an item’s details, for example, its images, description, cost, etc., and make such modifications in a few minutes.
Easy delivery process
Anything concerning delivery is complicated. We know. Luckily, Facebook Shops makes it incredibly easy by letting the seller decide whichever delivery option they prefer, as long as it guarantees shipping and tracking confirmation.
If you want to change your shipment’s specifications, proceed to the Commerce Manager to modify the delivery details, for example, the delivery cost, destination, and speed.
Grow your reach with advertisements
With around 3 billion monthly active users, FB is an epicenter of activity, with thousands of people accessing the platform every second worldwide. Running FB ads for your products and store will immediately improve conversions and expose your brand to new target audiences and potential customers.
You do not need a site
It may surprise you that not all online commerce companies need a website.
As clients can enjoy the same customer experience organically across the FB Shop platform, brands can do away with the necessity for a site. Consider the money and time you invest in employing developers, spending on hosting, and all the other expenses associated with keeping a website.
How Do You Create a Facebook Shop?
Before running a Facebook store, you must follow the requirements below:
- A FB profile and a FB Business page connected to it.
- Your FB page must get at least 2000 likes.
- Your items should be physical; digital products are not permitted.
- Your company must have an official permit to work in the state from where you are selling.
- You need an active bank account with your FB name.
- You should own a Tax Identification Number (TIN).
Step 1: Sign in to the FB page
Open your FB Business account. You need admin credentials to use it. The Shops tab shows a range of FB stores visible only to you, not your customers. Choose “Shop” on the left-hand side of the webpage to start.
Step 2: Develop your store profile
This action depends on your company’s location. For US-based stores:
- Find the Shop section and read the explanation in the pop-up. Choose the “Get Started” option.
- Fill in the required business information.
- Provide your TIN and state. You may skip this step if you do not have a TIN, but you will eventually need to add this information.
- Include the items you wish to offer.
- Enter all the other necessary business details.
The procedure is similar for non-American stores, with a couple of differences. First, check and accept your Merchant Terms agreement; fill in business information like your company name and contact details.
The main difference is how you wish to handle the transactions. For example, you may choose to Check Out Another Website or Message to Buy. The latter option requires a client to send a message right to the merchant for the entire order. In turn, external eCommerce websites handle all processes using the Check Out on Another Website option.
Step 3: Choose your checkout method
FB Shops present three checkout solutions:
- Check out on Instagram and Facebook. This solution is only open to companies in the US. You need a valid business address and bank account in America.
- Check out the website. You need to have Page authorization to direct the checkout to the website.
- Checkout with messages. Clients can get in touch with you via WhatsApp or Messenger. As this solution doesn’t require a checkout, you should add your order processing and payment system.
Step 4: Create your business account
Set up your Business Manager profile. You can create two accounts by filling in the brand name, the name of your business manager, and the work emails.
Step 5: Manage the catalog of products
Pick the store catalog you wish to add. The Service one fits non-tangible services such as house cleaning, hair cutting, consulting, or designing. The Product catalog helps to sell tangible products that require delivery to customers. Ensure you choose the right type because you cannot edit it later.
Once you’ve picked a category, you may start your collection. It’s possible to upload one item and add the rest when the setup is finished. Don’t forget to input product information every time you add a product. This information includes the item’s name, description, images, videos, inventory, price, visibility, and shipping options. Stores outside America also need to present a checkout link.
This step will not be available if you do not have a product catalog. However, the FB platform will automatically make a catalog for your store. You can find it under your Commerce Manager.
Step 6: Choose a shipping option
Sellers can pick between Standard, Rushed, and Expedited shipping methods. Set up how much shipping will cost and how long it will take. Besides, you need to set a rule if you will charge extra costs for additional products and specify the return window. FB has a 30-day minimum refund policy.
Step 7: Set up the payment configurations
Enter the payment options FB Shop provides based on your location. For American companies, it is typical to launch a bank account and get the payments directed there. For worldwide transactions, FB uses Stripe and PayPal.
Step 8: Check your store details and submit them for approval
Review your profile to make sure all details are correct. Check and accept your Seller Agreement. Usually, it takes up to 48 hours to get approval for your FB Shop unless there’re some issues with it.
After completing the setup, you can add more items, adjust the store’s look, and make it available to visitors.
Final Thoughts
That’s it! You have just learned how to run your business on Facebook and hopefully have created your own FB Shop page by now. But, unfortunately, things usually change often in the online world, so if you ever need assistance with carrying out specific actions on your Shop page, you may find the guidance on the official page from FB Help Center.
Just beginning your adventure with eCommerce and online stores? Then, check out our in-depth guides on starting an Amazon online shop from scratch in our blog. We go through the process step-by-step and do not omit any crucial details that may become a roadblock to you.
Besides, do not forget to register for SellerSonar’s free 29-day trial and learn how to boost your sales with an ultimate listing monitoring experience.

