




Amazon moves fast, and small listing changes can turn into bigger problems if you miss them. SellerSonar helps you stay on top of that. It monitors your Amazon listings around the clock and alerts you when something important changes.
This guide brings together SellerSonar’s main tutorials in one place. Use it to find the right walkthrough faster, understand how each feature works, and build a monitoring workflow that fits your products, team, and day-to-day catalog checks.
Which plan each feature needs. These walkthroughs cover the whole product, and a few features depend on your plan. Worth a look before you follow one.
| Feature | Pro | Premium | Business | Enterprise |
|---|---|---|---|---|
| Alerts, keywords, groups, catalog management, data export | Yes | Yes | Yes | Yes |
| Alert update frequency | Every 4 hours | Every 2 hours | Every hour | Every hour |
| Competitors | Basic | Basic | Full, AI-powered | Full, AI-powered |
| Buy Box Tracker | No | Yes | Yes | Yes |
| Share of Voice and Share of Shelf | No | No | Yes | Yes |
| Listing Quality Checker | Paid add-on | Yes | Yes | Yes |
| Review tracking | No | Yes | Yes | Yes |
Plans change, so check the current plans comparison before you upgrade.
How to Add Stores and Products
Plan: All plans · 1 min
Let’s start with the basics: adding your store, brand, and products to SellerSonar. You do not need direct access to Seller Central to get started.
Sign up for a free 14-day trial or log in to your existing subscription.
Bonus tip: If you are exploring the SellerSonar trial, complete simple tasks in your account, such as adding stores or competitors, and earn extra days of monitoring.
After logging in, go to the Stores/Brands page. You can add products in bulk by entering your seller or brand store ID. If that is easier, you can also paste your Amazon store link.
You can add products one by one as well. Click Add Product, enter an ASIN, and choose a marketplace or paste the product URL. SellerSonar can also add all product variations and ASINs across marketplaces.
Once the products are added, SellerSonar starts processing them. Depending on store size, this usually takes from a few minutes to about an hour.
How to Set Up Alerts
Plan: All plans · 3 min
Now let’s move to alerts, one of the core parts of the workflow.
Our tool monitors your product listings continuously and sends notifications when something changes. Alerts are grouped into seven categories: Retail Issues, Content Changes, Buy Box & Pricing, Ranking & Category, Reviews, Badges, and Others.
For example, if a new seller appears on your listing or your title changes, you will receive an alert. The alert also includes guidance on what may have happened and what to check next.

Product Notification Settings
Notification Frequency and Priority
Besides in-app notifications, SellerSonar also sends daily and weekly reports. If you need faster visibility for urgent issues, you can adjust notification frequency. In Settings, divide alerts into critical and regular. Critical alerts can be sent 24/7 by email, while regular ones can stay in daily or weekly reports.

Sending Settings
Filtering Alerts by Product and Marketplace
You can choose which products, brands, stores, or marketplaces should trigger email alerts. You can also use up to three email addresses and split products between them. For example, one manager can receive alerts for Amazon.com while another handles Amazon.it.
You can also filter and export alerts for all monitored products into one file. Each report includes the ASIN, marketplace, and alert type.
To configure alerts, open Delivery Settings on the Alerts page.
How to Organize Products and Keywords into Groups
Plan: All plans · 12 min
Use this tutorial when one long list of ASINs and keywords has stopped being manageable. Groups let you split a catalog by brand, bestsellers, or campaign.
The video covers how to create a product group from filtered products on the Products page, add products to a new or existing group, and assign a group while adding a new ASIN. It also walks through bulk upload with the CSV or XLSX template, where one file sets the marketplace, ASIN, and group name for every product.
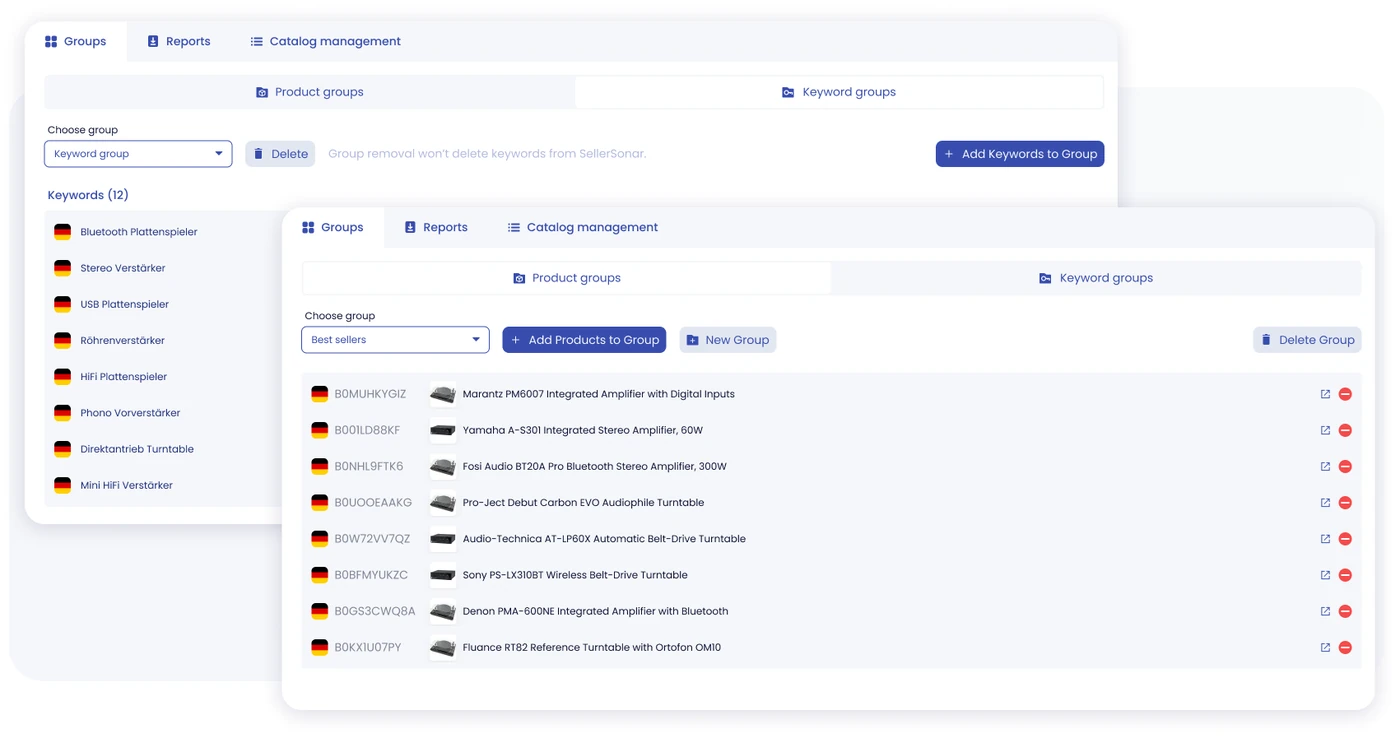
Product groups and keyword groups live on the Groups tab in Settings
Groups also decide who hears about what. You can turn on specific alert types for selected product groups only, then send those alerts by email, Slack, or webhooks.
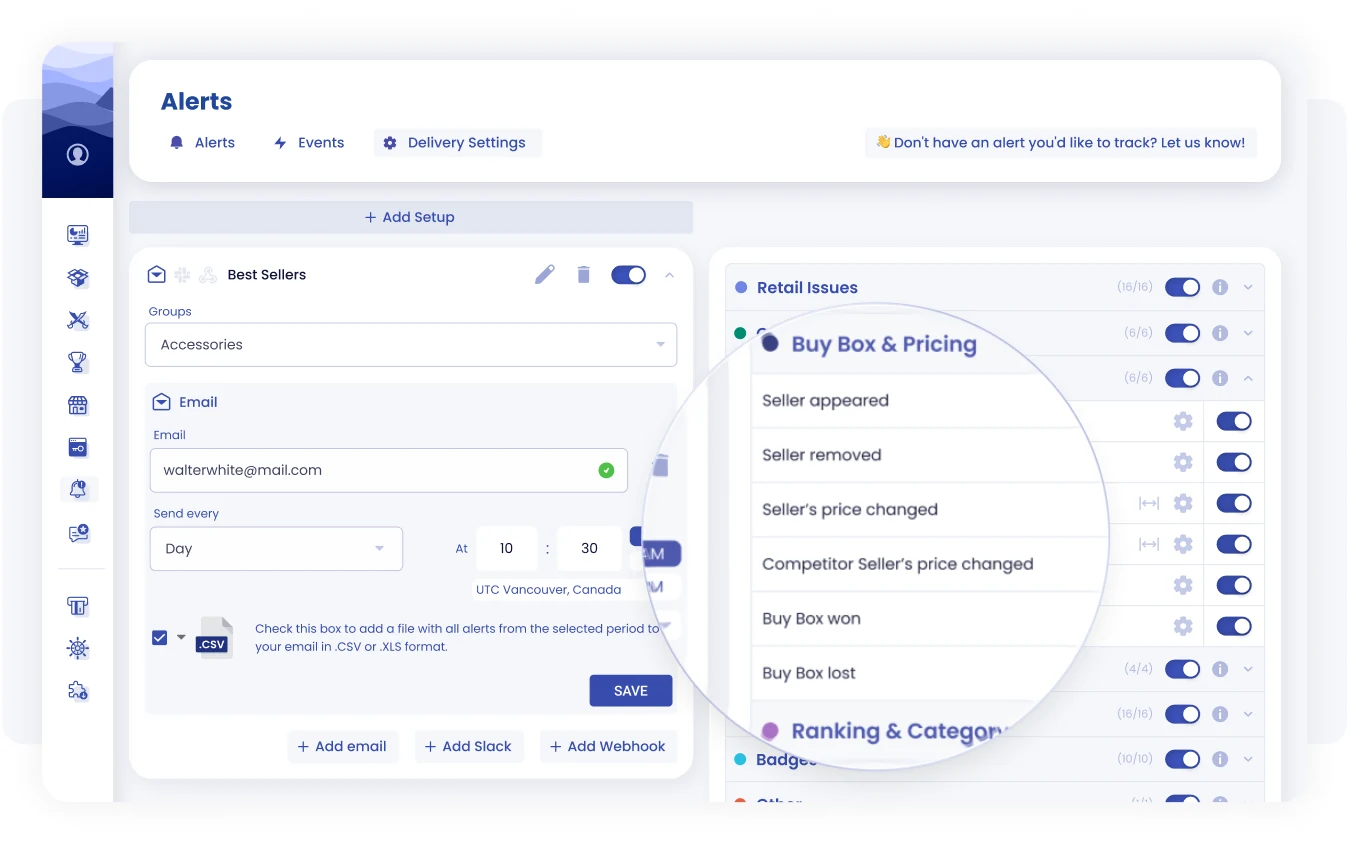
Limit an alert setup to a product group, then choose email, Slack, or webhooks
The last part moves to Keyword Tracker: creating keyword groups, marking keywords as Favorites, adding keywords to a group from the Heatmap, and removing or deleting a group.
Jump to a chapter:
- 00:39 Group existing products
- 02:09 Group new products
- 03:12 Bulk upload with the CSV or XLSX template
- 06:39 Add or remove products
- 07:17 Alerts by product group
- 08:26 Keyword groups
- 09:33 Favorites
- 10:42 Group from the Heatmap
- 11:25 Edit and delete groups
How to Track Keyword Rank
Plan: All plans · 3 min
By monitoring relevant keywords for your products, you can estimate search visibility and performance more clearly.

Keyword research
After adding or importing keywords, you will see performance data on the Keywords page. SellerSonar shows how many keywords rank in Organic top 10, top 50, Ad top 10, or hold the Organic Amazon Choice badge. You can review the overall picture or filter the data by brand and product.
The keyword trend chart helps you monitor movement over the last seven days. You can also review longer periods, such as one month, six months, or one year. If you track competitors, you can compare long-term keyword movement for each term.
For deeper analysis, export keywords for one product or download up to 300 Amazon search results for a selected keyword. The export can show whether each result was organic or sponsored.
How to Import Multiple Keywords
Plan: All plans · 1 min
To add multiple keyword phrases, go to the Keywords tab and use File Import to open the upload window. Then download the template and fill it with your keywords.
Use the marketplace names exactly as shown in the template. Otherwise, SellerSonar will not recognize them.
Once the keywords are in your account, you can add competitors and expand your keyword monitoring setup.
Plan: Business and Enterprise · 8 min
Use this tutorial to check which brands appear most often in Amazon search results for the keywords you track. It is useful when you need a clearer view of organic and sponsored visibility for important search terms.
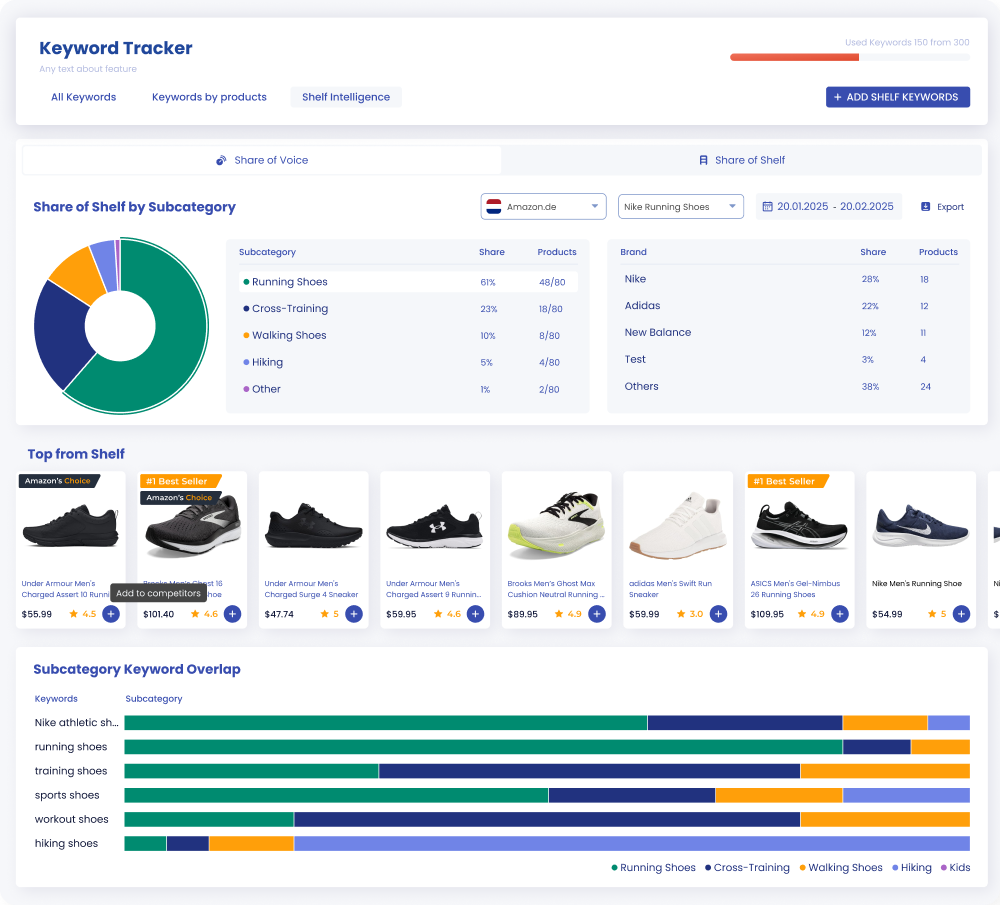
Shelf Intelligence inside Keyword Tracker
The video covers how to open Shelf Intelligence, add shelf keywords, apply filters, and review Share of Voice by marketplace, keyword, time period, and result type.
You can also check the top brands, their Share of Voice percentage, and the detailed table with ASINs, positions, prices, and badges.
Plan: Business and Enterprise · 5 min
Use this tutorial to see where a keyword performs across subcategories inside Shelf Intelligence. It is useful when you want more context than a brand-level visibility view can give you.
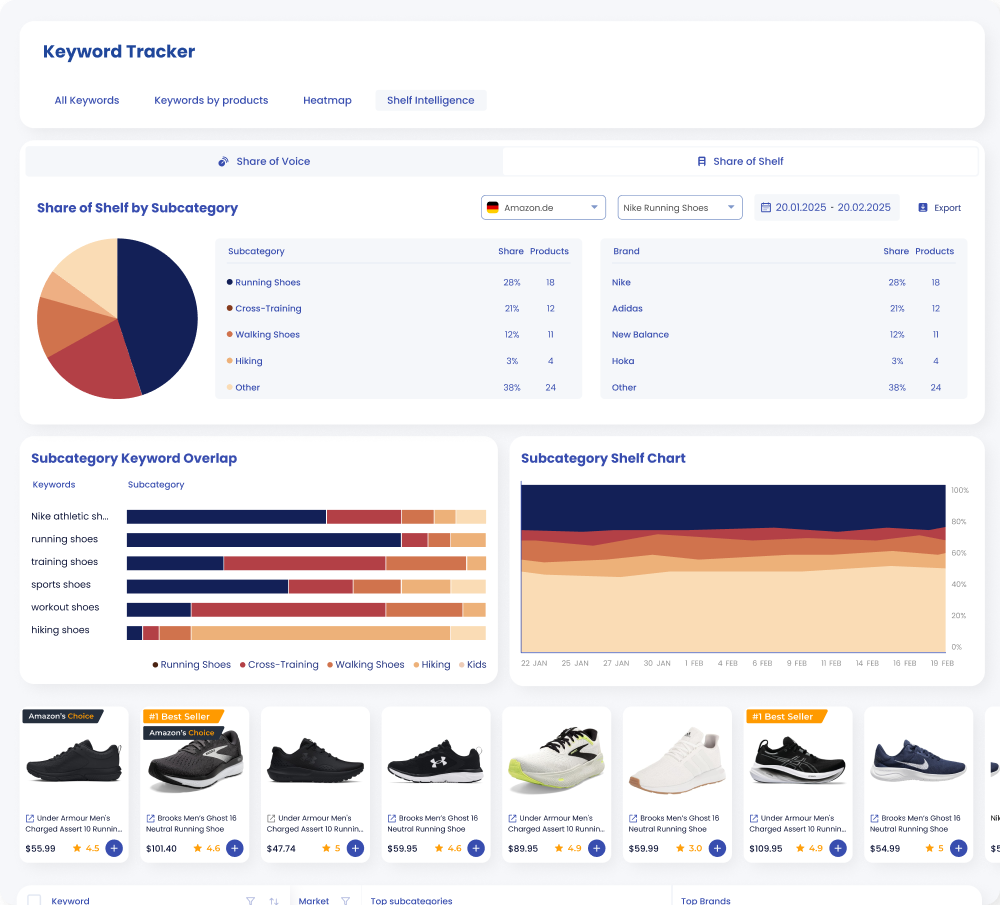
Share of Shelf by subcategory
The video covers how to apply filters, review top subcategories, and check which brands are taking up space inside those subcategories.
You can also review sample products, check keyword overlap, and add products for competitor tracking from the same view.
How to Monitor Competitors
Plan: All plans · 2 min
Next, let’s look at how SellerSonar supports competitor research and helps you stay aware of changes across competing listings.

Competitor Research
Adding competitor ASINs takes only a few clicks. You can do it from the Products or Competitors pages. After that, make sure competitor alerts are turned on in Delivery Settings on the Alerts page.
Competitor monitoring is on every paid plan, but the depth differs. Pro and Premium include the basic view, while Business and Enterprise add the AI-powered one. Each competitor product also uses part of your product limit.
What You Can Compare
Once the data is loaded, you can compare price, rating, and review count. You can also review listing descriptions, bullet points, and images.
Charts for Ongoing Competitor Analysis
SellerSonar also includes graphs that help you spot patterns and make decisions faster.
- The rating chart helps you compare strengths and weaknesses across products. You can review review count, review tone, and one-tap reviews, then sort by product and time period.
- Buy Box price charts show how price moved over time and how those changes may affect sales.
- Keyword charts show changes in rank history for both organic and paid traffic. They also let you compare your position against competitors.
- The BSR chart compares your product’s BSR with competitor BSR inside the same categories.
By following these tutorials, you can build a clearer view of your competitive space. SellerSonar helps you catch changes earlier and investigate them faster.
How to Track BSR Performance
Plan: All plans · 3 min
Use this tutorial to monitor your ASIN’s BSR performance in SellerSonar. It is useful when you want to track category movement over time and compare ranking changes more clearly.
The video covers how to open BSR history from the Products page, review ranking data across different time periods, and compare main category and subcategory performance.
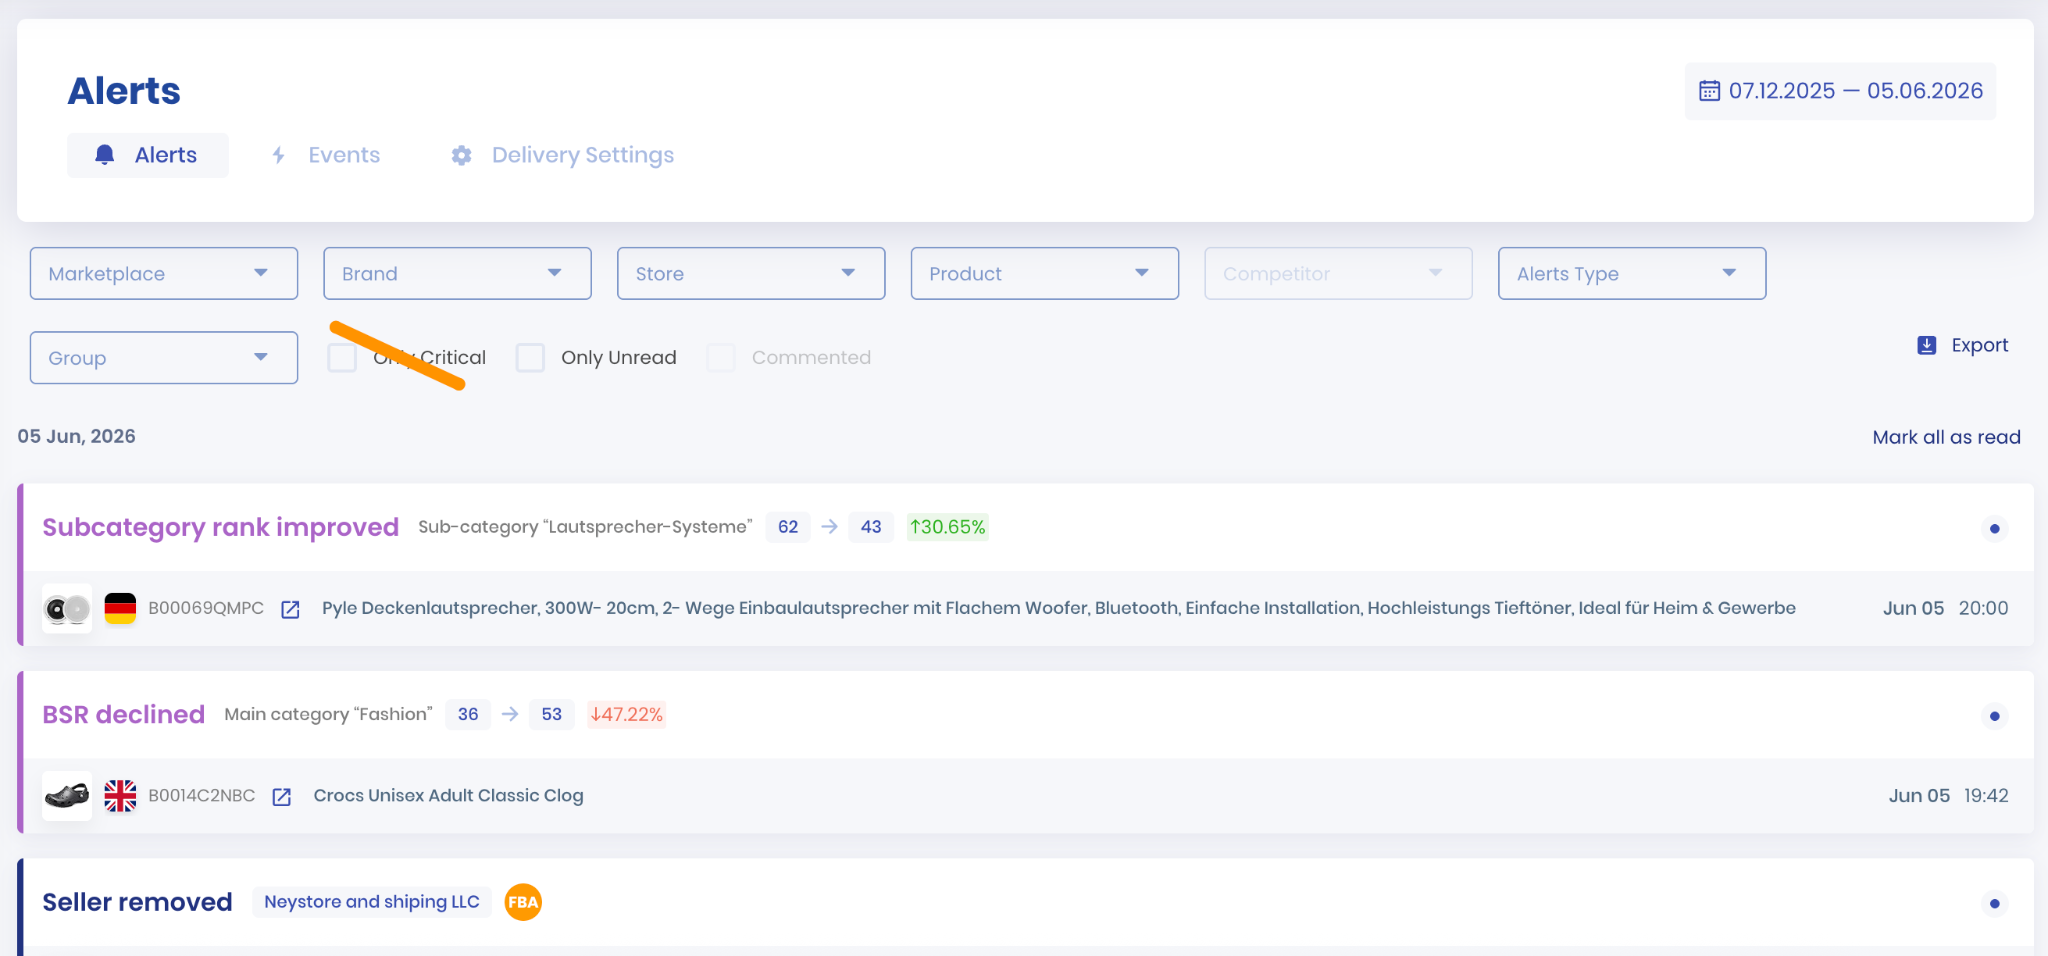
BSR and subcategory rank alerts in the Alerts feed
You can also add competitor ASINs, turn on side-by-side comparison, and set BSR alerts based on percentage change.
How to Track the Amazon Buy Box
Plan: Premium and up · 2 min
Use this tutorial to understand how Amazon Buy Box tracking works inside SellerSonar. It is useful when you need to see who is winning the Buy Box and catch ownership changes earlier.
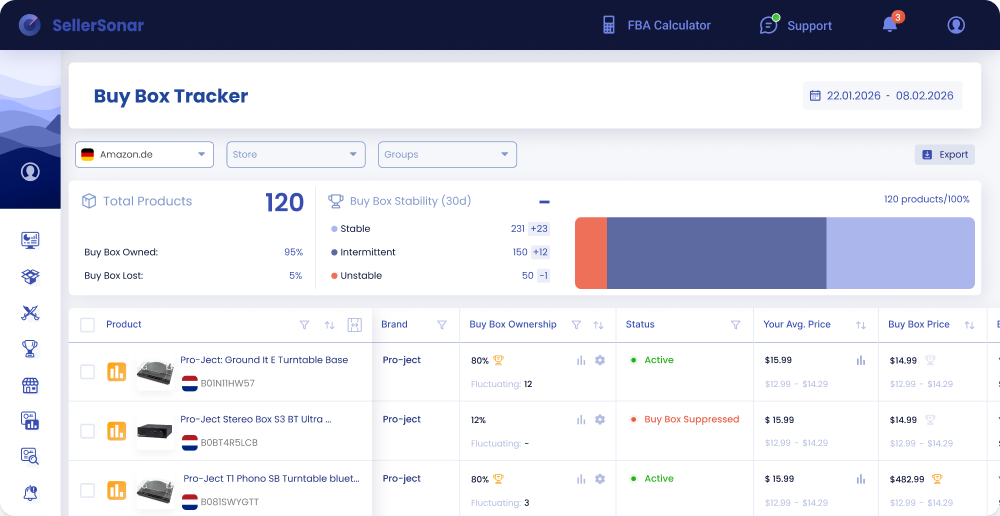
Buy Box ownership, stability, and status for each product
The video covers how to open the Buy Box Tracker, review ownership over different time periods, and compare price and fulfillment data next to Buy Box changes.
On the Buy Box Tracker page, you can see who has been winning the Buy Box and at what prices, for the last day or a longer period such as the last 10 days. A chart compares the top sellers over time, so dominant sellers and unstable ownership stand out quickly.
You can also set Buy Box won and lost alerts, choose which Seller IDs to track, and export data when you need a deeper check.
How to Use the Buy Box Tracker
Plan: Premium and up · 6 min
Use this tutorial to work with the Buy Box Tracker page in more detail. It is useful when you need to check unstable Buy Box control, compare sellers, or review listings that need closer attention.
The video covers how to choose the right sellers for tracking, apply filters for marketplace, seller, time period, stability, status, and brand, and review Buy Box win and loss data.
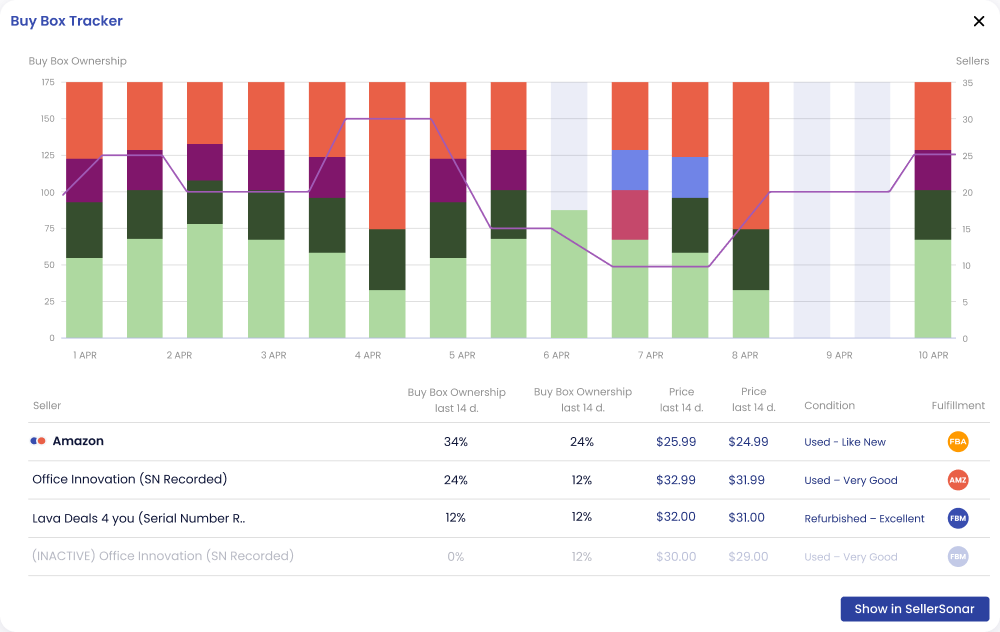
Seller-level Buy Box history for one product
You can also open the detailed seller view for pricing, fulfillment, and seller history, then move to related Buy Box data on the Products page and in alerts.
How to Check Variation Accuracy
Plan: All plans · 5 min
Use this tutorial to check whether your parent-child variation setup matches the structure you want to track. It is useful when you need to confirm that variation relationships are correct before relying on ongoing monitoring.
The video covers how to open Catalog Management, download the variation template, review parent and child relationships, and upload the file back for verification.
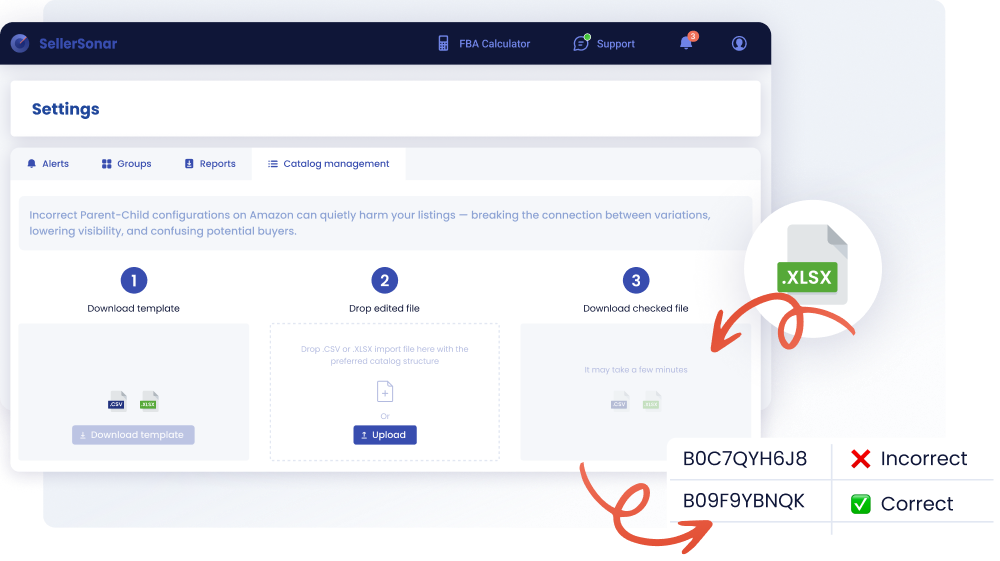
The variation check in three steps
You can also use that uploaded file as the reference for future variation monitoring, including checks for incorrect, missing, or broken variation structure.
How to Use the Listing Quality Checker
Plan: Premium and up, paid add-on on Pro · 6 min
Use this tutorial to check how strong your Amazon listing looks and spot areas that may need improvement. It is useful when you want a faster way to review one ASIN, understand weak content elements, and see where your listing may be losing quality.
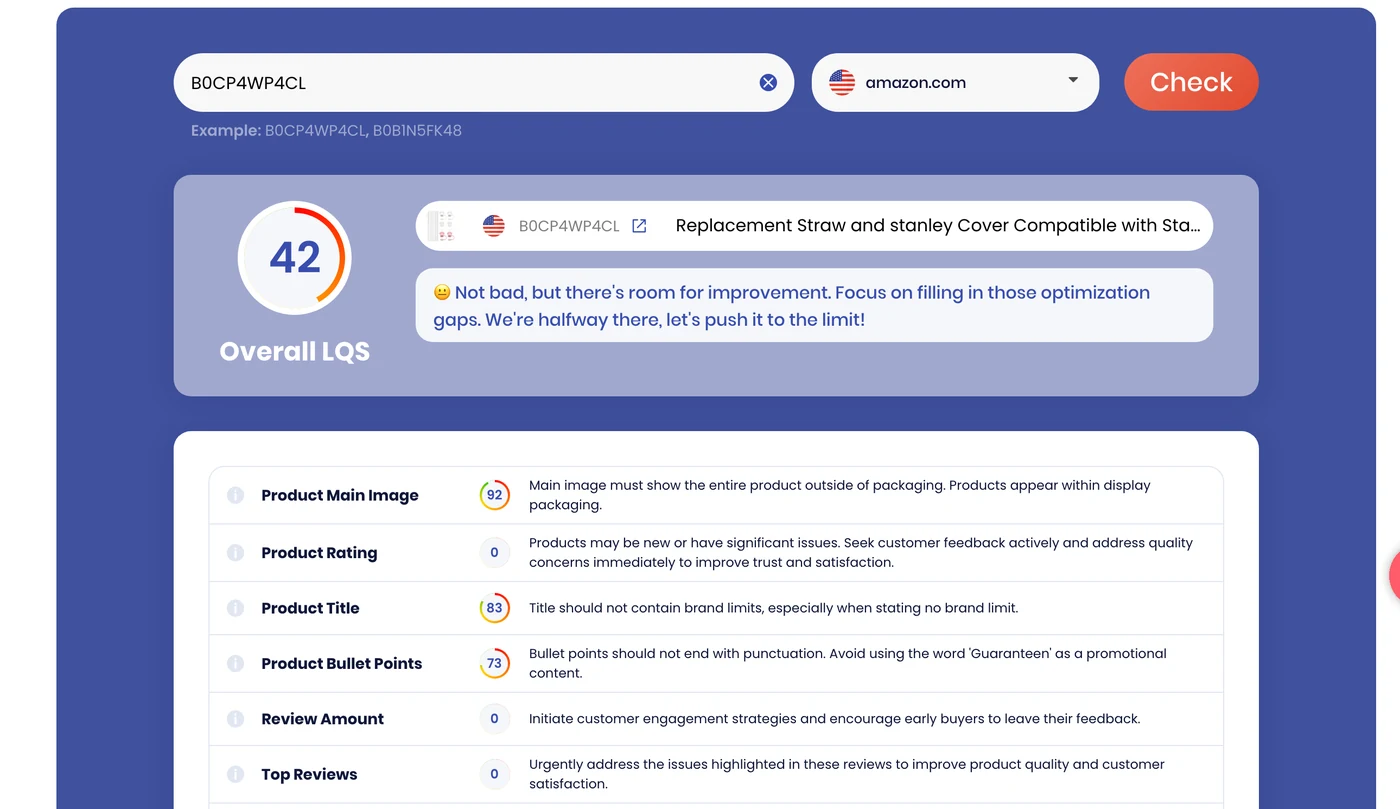
Listing Quality Checker result for one ASIN
The video covers how to open SellerSonar’s Listing Quality Checker, enter an ASIN, choose a marketplace, and review the overall Listing Quality Score together with the detailed criteria behind it. You can also see suggestions for improving titles, images, bullet points, videos, reviews, and other visible listing elements.
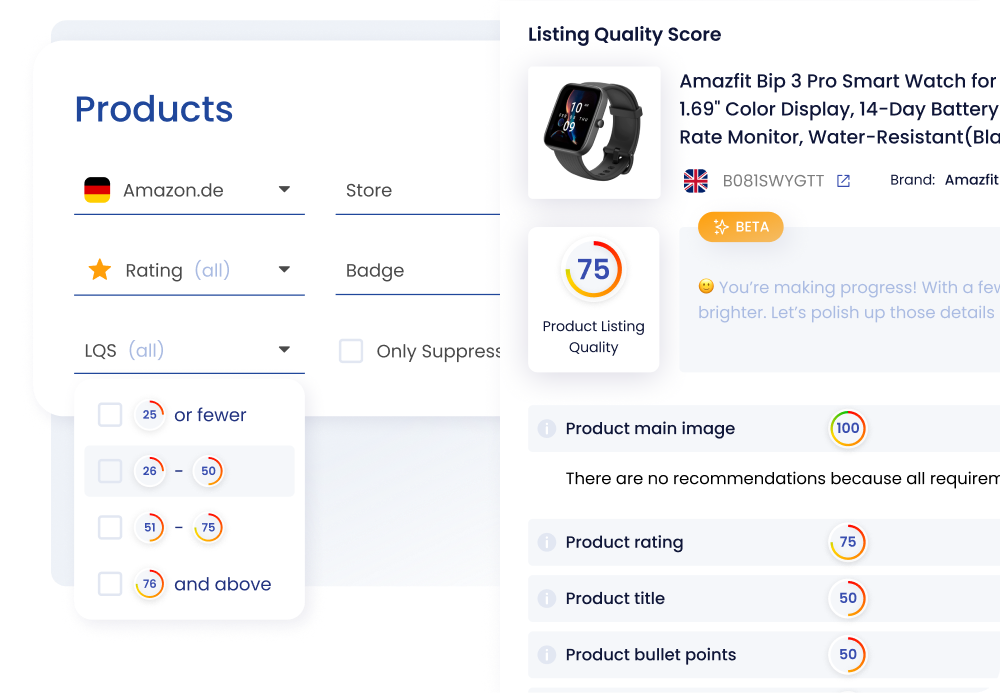
Filter products by LQS range and open the score breakdown
If you are already using SellerSonar, this walkthrough also shows where LQS data appears inside the app. You can review scores from the dashboard, filter products by LQS range, compare competitor scores, and track score changes inside alerts after listing updates.
How to Generate Reports
Plan: All plans · 5 min
Use this tutorial to export filtered data from different parts of SellerSonar. It is useful when you need to download product, competitor, Buy Box, keyword, alert, or review data for a deeper review.
The video covers how to apply filters, export data in CSV or XLSX format, and generate reports from Products, Competitors, Buy Box Tracker, Keyword Tracker, Heatmap, Alerts, and Reviews.
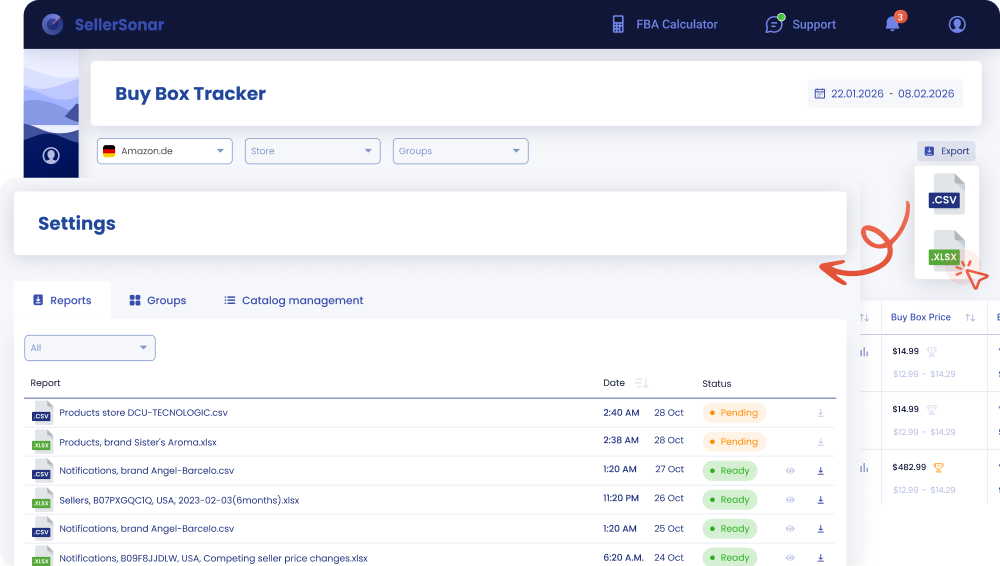
Finished exports are listed on the Reports tab in Settings
You can also open the Reports section in Settings to preview files, download them once ready, and access stored exports for up to 60 days.
Still have questions? Leave a comment below and we’ll point you in the right direction.
If you’d like help setting up SellerSonar or understanding which features fit your workflow best, you can book a live demo.
You can find every tutorial, and new ones as we publish them, on the SellerSonar YouTube channel.
Thanks for following along, and happy monitoring.

