Table of Contents
- 1 Why Amazon Listing Content Changes Without Warning
- 2 What Can Change on Your Amazon Listing
- 3 How Amazon Listing Changes Affect Your Rankings and Revenue
- 4 How to Monitor Amazon Listing Changes: Your Options
- 5 Setting Up Automated Amazon Listing Alerts: Step by Step
- 6 How to Respond When Your Amazon Listing Changes
- 7 Amazon Listing Monitoring Software: What to Look For
- 8 Conclusion

Quick Answer
Amazon listing monitoring is the practice of tracking changes to your product listings (title, images, bullet points, pricing, category, and more) and receiving alerts when something changes without your input. Because Amazon allows multiple parties to modify listing content and doesn’t always notify sellers when it happens, automated monitoring is the only reliable way to catch changes before they affect your rankings and revenue.
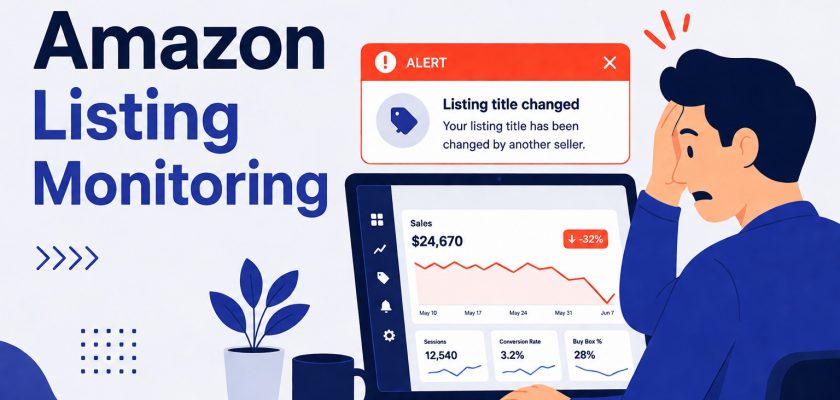
Marcus had a Thursday morning that I still think about.
He checked his sales dashboard at 8 AM and saw a 40% drop overnight. Inventory? Fine. PPC? Running. Price? Competitive. Nothing in Seller Central flagged anything wrong.
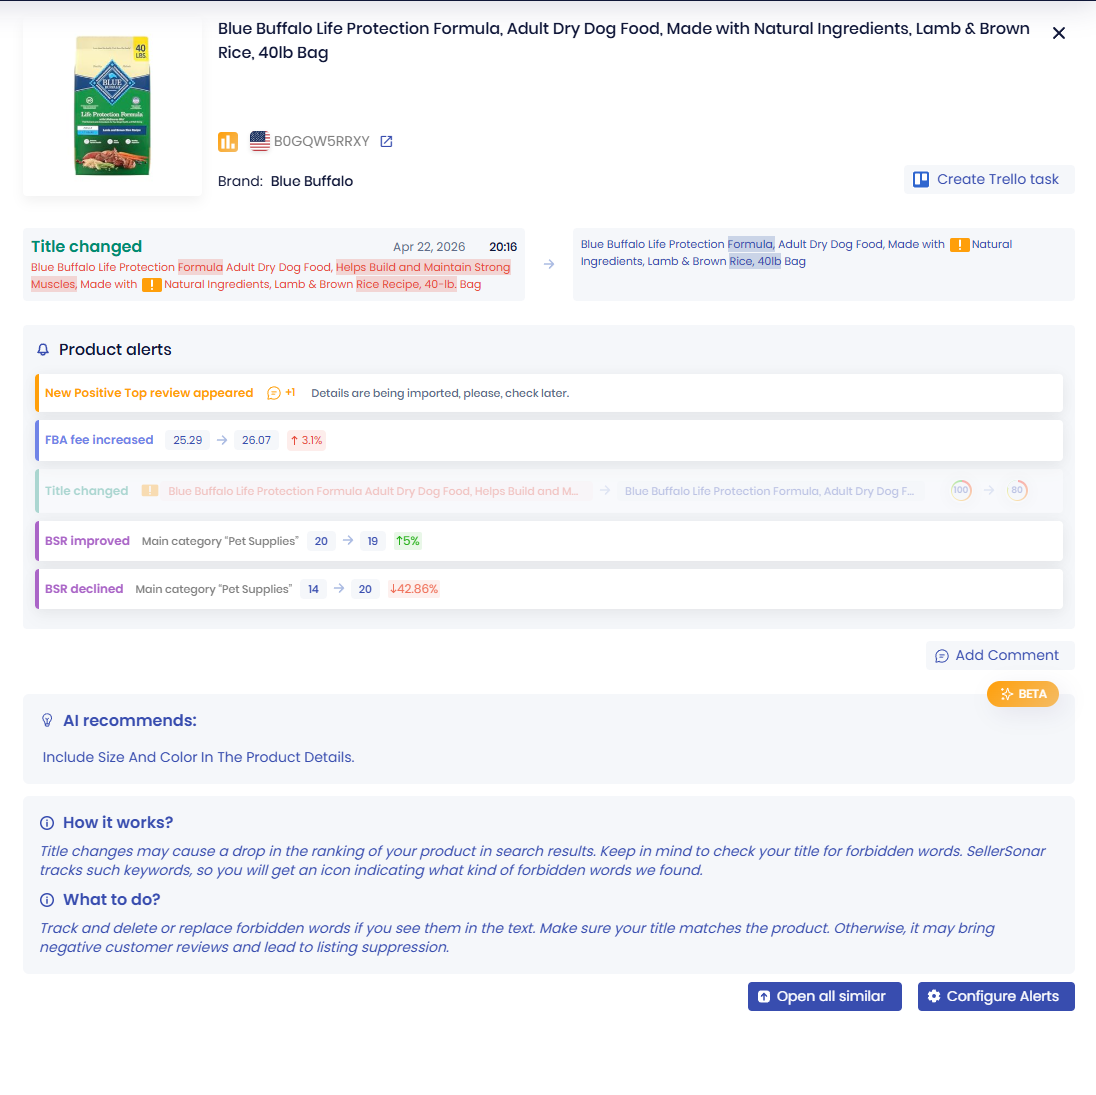
Three days later, he traced it back. Amazon’s catalog team had quietly swapped his keyword-optimized product title for a generic description that matched their internal category taxonomy. No email. No notification. Just a title change that cost him his primary keyword ranking, and $800 in PPC spend trying to recover it before he even understood what had happened.
That’s what Amazon listing monitoring exists to prevent. The problem isn’t that listings change. They’re going to change. The problem is that they change without telling you, and by the time you notice, the damage is already compounding.
You probably already know about hijackers appearing on your listing. But here’s what most sellers find out the hard way: it’s not always a competitor doing the damage. Sometimes Amazon itself modifies your listing content without sending you a heads-up. That changes everything about how you need to approach protecting your listings.
In this guide, you’ll learn exactly what can change on your listing, who causes those changes, what the ranking impact looks like, and how to set up a monitoring system that catches Amazon listing changes before they compound.
About the Author: Written by the SellerSonar content team with contributions from Amazon seller specialists who have collectively managed catalog monitoring for thousands of ASINs across private label brands and agencies. Our experience tracking listing changes across 15+ Amazon marketplaces informs every recommendation here.
Why Amazon Listing Content Changes Without Warning
Here’s the thing most sellers don’t know until it costs them: you are not the only party who can change your Amazon listing.
Amazon’s catalog is a shared database. Multiple sellers can submit data on the same ASIN. Brand Registry contributors can push updates. And Amazon itself has processes that “correct” listing content based on its own categorization logic.
When these sources conflict, Amazon’s algorithm decides what stays. Your carefully crafted content doesn’t automatically win.
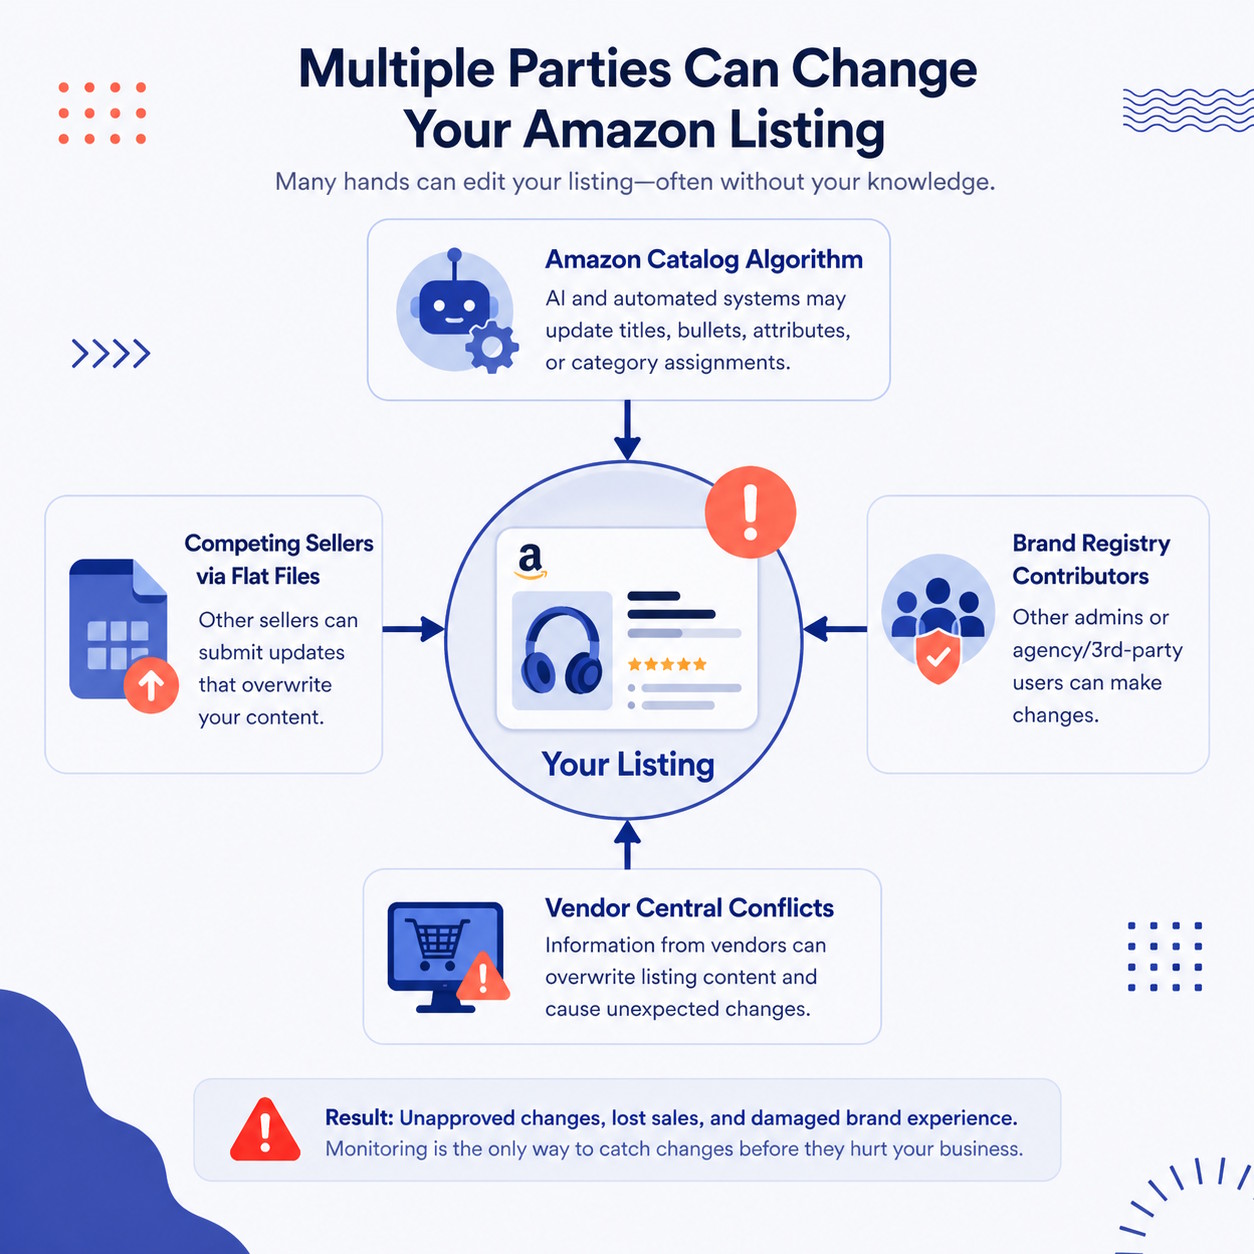
So who actually causes Amazon unauthorized listing changes? Four categories:
Amazon’s catalog algorithm. This is the one that surprises sellers most. Amazon periodically runs what it calls catalog quality initiatives, where it normalizes listing data across categories. Your optimized title gets replaced with a standardized format. Your bullet points get rewritten to fit a template. No warning sent. No notification given. Ever.
Other sellers via flat files. Any seller listing the same product can submit a flat file that overwrites your listing data. This is common in wholesale and reseller categories, but it happens in private label too. A competitor submits “corrections” to your listing content, and Amazon accepts them over yours.
Brand Registry contributors. If your brand has multiple Brand Registry accounts or authorized agencies managing your content, any of them can push changes. Miscommunication inside your own team can cause the same problem as an outside attack.
Vendor Central conflicts. Brands that sell through both Seller Central and Vendor Central sometimes find that Vendor Central data overwrites Seller Central listings. The two systems don’t always agree, and Vendor Central typically wins that fight.
Amazon seller forums are full of reports matching this pattern. Something changed, Amazon didn’t send notification, and the seller only found out when sales dropped and they started digging.
💡 Expert Tip: Amazon’s catalog corrections tend to hit listings with inconsistent data across parent-child variations. If you have variations, audit all child listings to confirm consistent title formatting. Inconsistency signals Amazon to “fix” things for you, which usually isn’t what you want.
What Can Change on Your Amazon Listing
Most articles on this topic mention title and images, then move on. But there are more listing elements at risk, and some of the less-obvious ones hit just as hard.
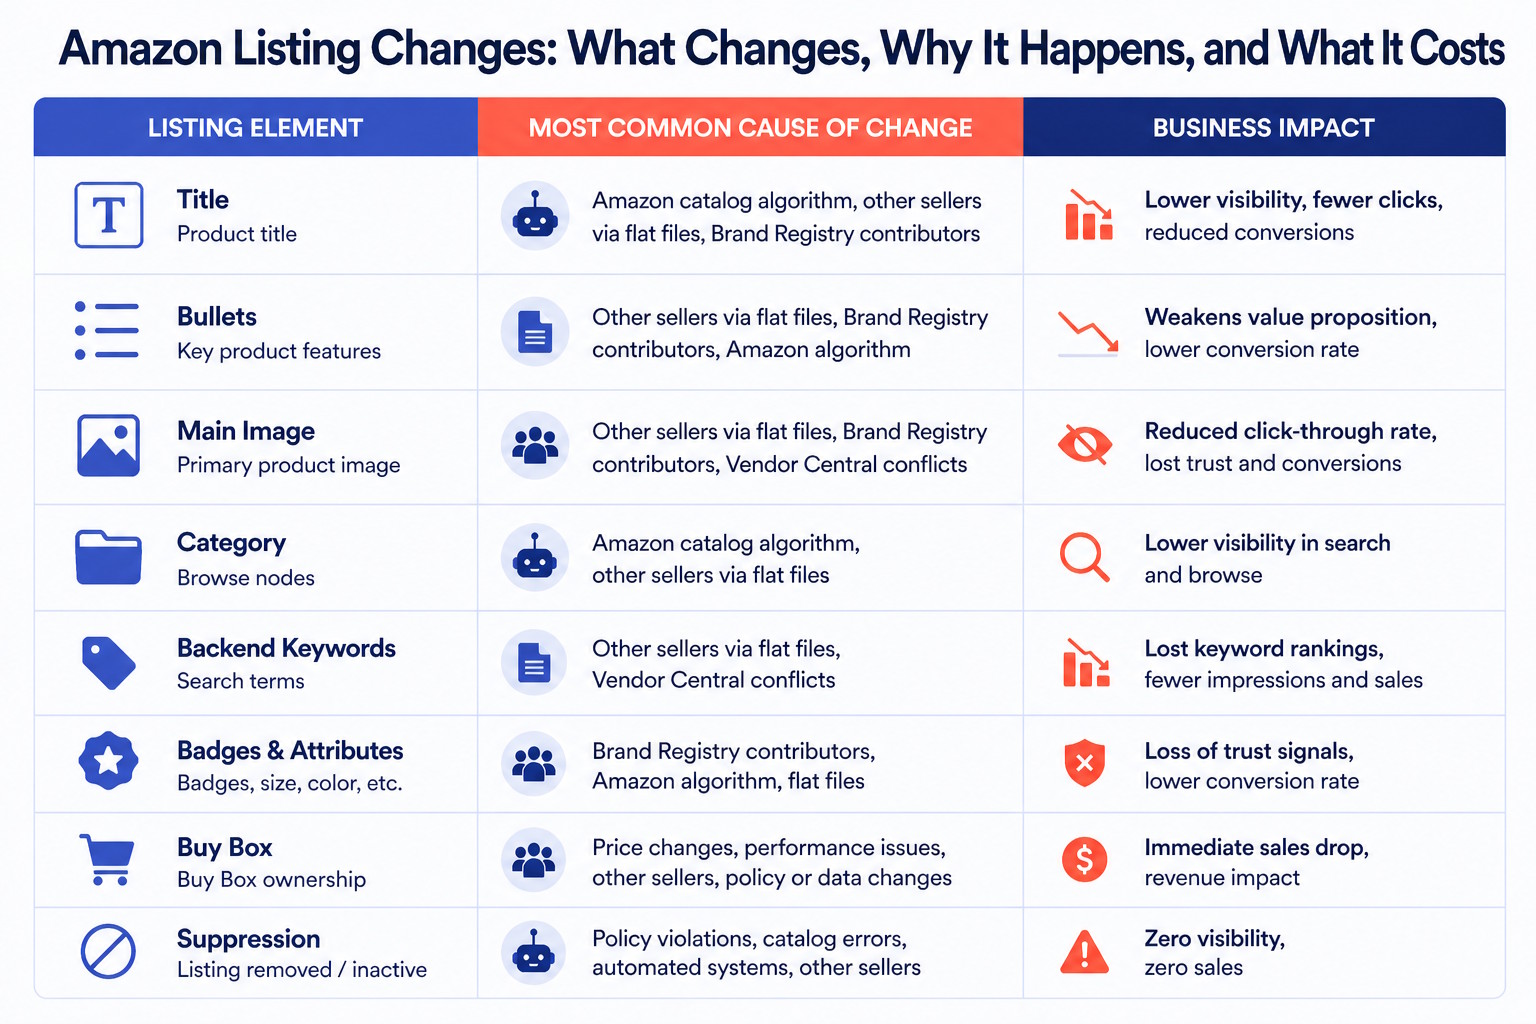
Here’s the complete list of what a proper Amazon ASIN monitoring setup tracks:
- Product title, the highest-priority element; title changes affect keyword indexing immediately
- Bullet points, regularly changed by algorithm-driven “improvements” or flat file overwrites from other sellers
- Product description and A+ content, A+ content can be removed entirely if it conflicts with catalog data
- Main image and gallery images, Amazon can flag and replace images that don’t meet current requirements, even images that were approved before a policy update
- Product category and subcategory, a category change shifts which browse nodes index your listing, affecting discoverability beyond keyword search
- Backend search keywords, these don’t display publicly, but changes here affect which queries your listing appears for
- Amazon’s Choice and Best Seller badges, won and lost based on sales velocity, reviews, and price, with no direct notification when they drop
- Buy Box status, can be suppressed if Amazon detects pricing issues or seller performance concerns
- Listing suppression, the listing can be removed from search results entirely, with no Buy Box and no visibility for buyers
That last one is worth a separate guide on its own. If you haven’t dealt with it yet, check the Amazon suppressed listing guide before you need it. Suppression issues are much easier to resolve when you’ve already read the playbook.
How Amazon Listing Changes Affect Your Rankings and Revenue
The changes themselves aren’t always catastrophic. The delay in catching them is.
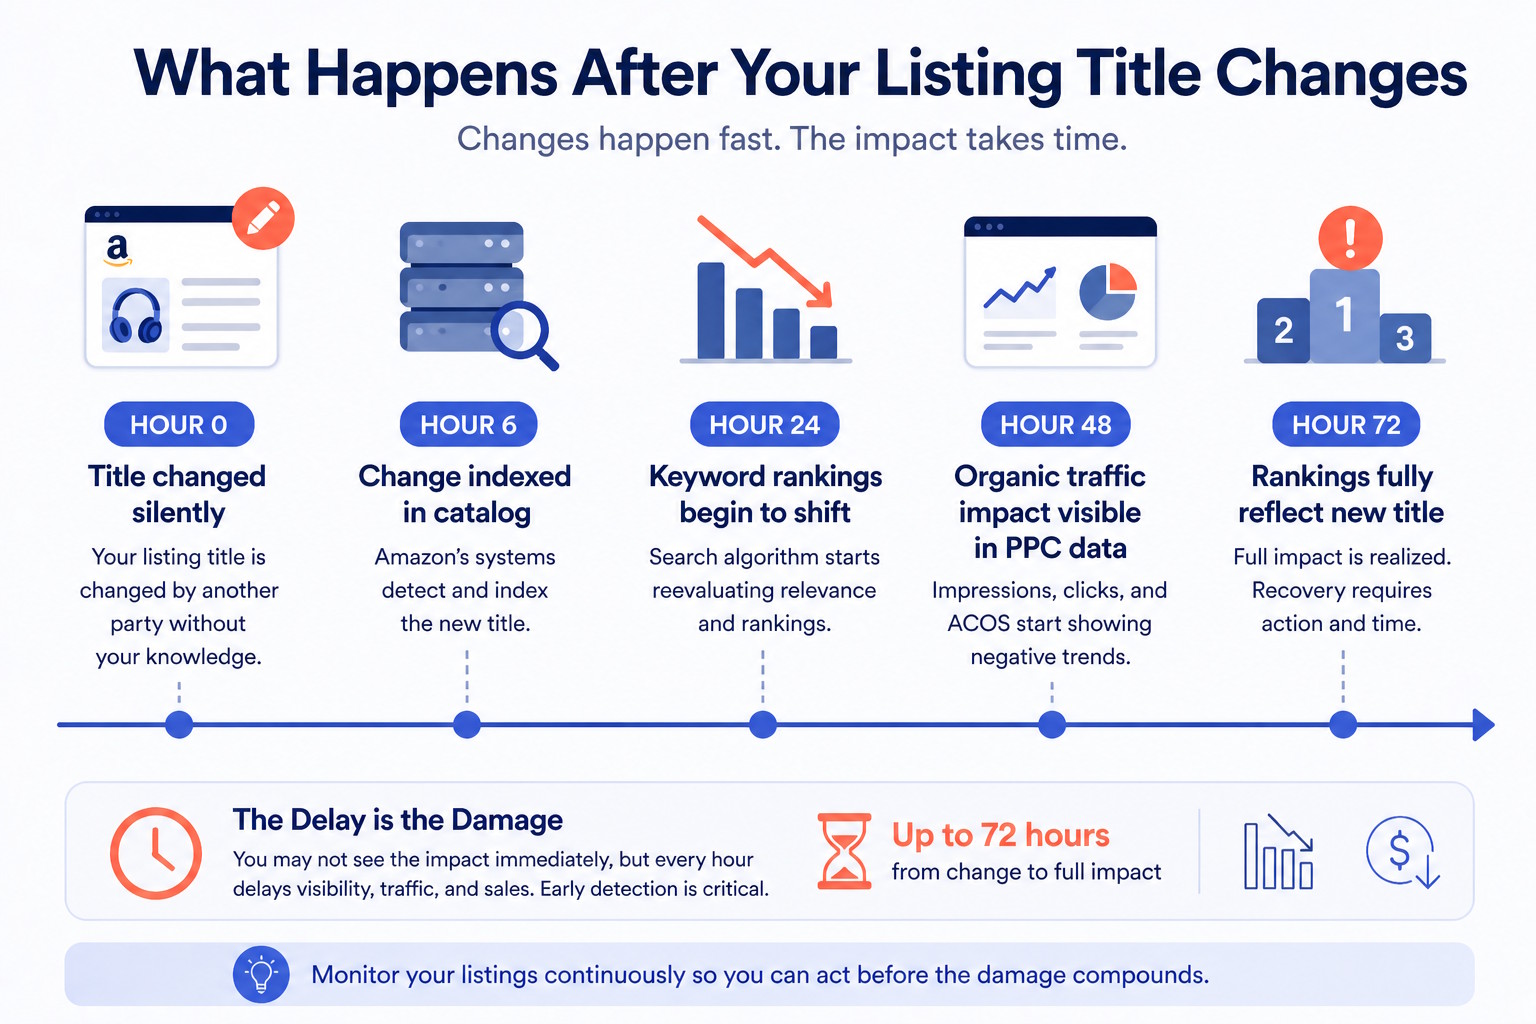
Here’s the timing problem. Title and description changes take 24-48 hours to propagate fully through Amazon’s index. So if your title changes at midnight Thursday, you won’t see the ranking impact until Friday or Saturday. By the time you notice something is wrong, you’ve already lost two days of indexing for your primary keywords.
Image and backend keyword changes take longer. Three to seven days in most cases. Which means you could be running PPC against keywords you’re no longer organically indexed for, paying for traffic that converts below potential because the main image (which drives CTR) or the backend search terms (which affect relevance) changed last week.
The compounding effect is what kills sellers. Each undetected change adds to the damage:
1. Title change removes a primary keyword from your listing
2. Ranking for that keyword drops over 48-72 hours
3. Sales velocity drops as organic traffic declines
4. Declining sales velocity further damages your rankings
5. PPC spend increases to compensate for lost organic reach
Marcus’s $800 PPC spend to recover his ranking wasn’t wasted, exactly. But it was entirely preventable. If he’d caught the title change within a few hours, he could have reverted it before the ranking impact had time to compound into a full recovery campaign.
Manual monitoring creates 24-48-hour blind spots at minimum. That’s assuming you check every listing every single day. Most sellers with 50+ ASINs are checking once every few days at best. The actual blind spot is probably closer to 72-96 hours.
🎯 Pro Insight: The highest-risk window for listing changes is overnight and on weekends. Amazon’s catalog processes run continuously, and sellers submitting flat file overwrites know account owners are less likely to be watching at 2 AM. From what we see across thousands of monitored ASINs, a disproportionate share of listing changes happen between 10 PM and 6 AM local time.
How to Monitor Amazon Listing Changes: Your Options
You have three options. Two of them have serious problems.
Option 1: Manual monitoring
Go to each product page. Check the title. Check the images. Check the bullets. See whether anyone new appeared in the “Other Sellers on Amazon” section.
You can do this for five listings. Maybe 10.
At 50 listings, you’re looking at 2+ hours of daily manual checks that still won’t catch changes happening between check cycles. At 100 listings, it’s a part-time job. And none of this covers backend keywords, category assignments, or suppression status. Those aren’t visible on the product page.
Manual monitoring gives you confidence. It’s just false confidence. You checked yesterday. The change happened at 2 AM today.
Option 2: Amazon Seller Central notifications
Seller Central sends some alerts. Policy violations, account health warnings, suppression notices (sometimes). But Amazon’s notification system has documented gaps.
It doesn’t tell you when another seller changes your listing data through a flat file. It doesn’t notify you when the algorithm corrects your title. It won’t tell you when you’ve lost the Buy Box or when a primary keyword quietly dropped out of your backend terms.
Amazon’s notifications are reactive and incomplete. They’re better than nothing. They’re not a monitoring strategy.
Option 3: Automated Amazon listing monitoring software
This is the only approach that scales with your catalog and catches Amazon listing changes before they compound into real losses.
Automated tools check your ASINs on a set interval (hourly for paid plans, every few hours for entry-level plans) and compare current listing data against a stored baseline. When something changes, you get an alert, before the damage has had 24 hours to run.
The best Amazon listing monitoring software does more than watch for changes. It also functions as an Amazon listing optimization tool, flagging existing quality gaps so you know where your listing is vulnerable before anyone makes an unwanted change.
Ready to see what’s actually changing on your listings right now? SellerSonar’s product listing alerts monitor every element in real time, with no Seller Central connection required. Try it free for 14 days.
Setting Up Automated Amazon Listing Alerts: Step by Step
If you’re setting up monitoring for the first time, here’s the practical sequence.
Step 1: Add your ASINs
Start with your top 20 ASINs by revenue. That’s where an undetected change does the most damage. Once you’ve confirmed the setup is working, add the rest of your catalog.
In SellerSonar, you add ASINs directly through the dashboard or via bulk CSV upload. The tool establishes a baseline of your current listing data within the first check cycle, so you’ll start seeing changes relative to that snapshot immediately.
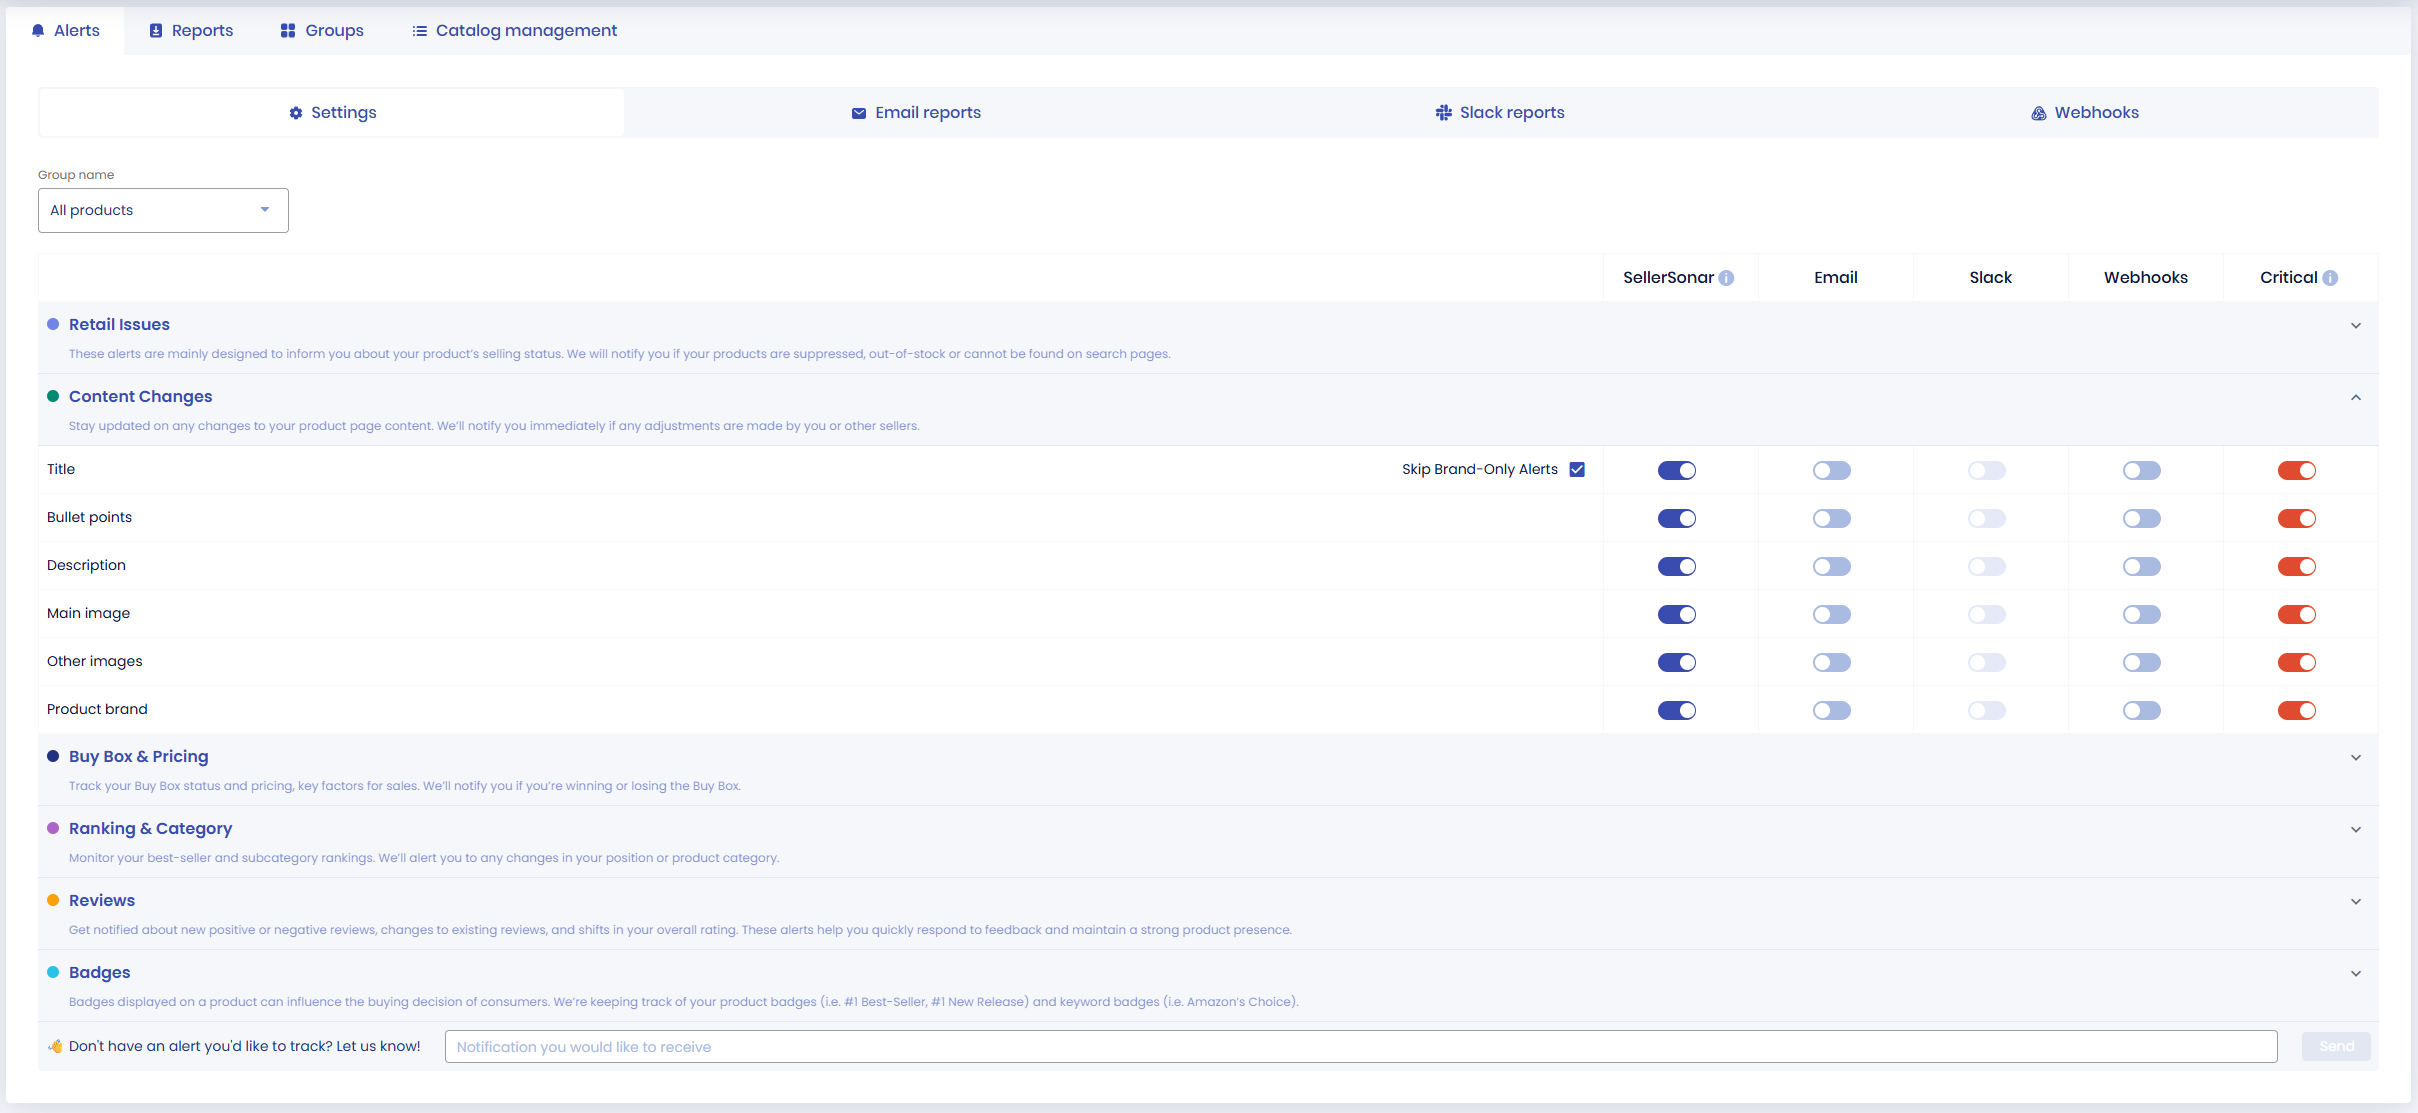
Step 2: Configure which changes trigger alerts
Not every change needs a panic response. A price adjustment of a few cents is different from your title getting rewritten. Set your alert priorities to focus on:
- Any title change (always high priority)
- Any change to the main image (high priority)
- New sellers appearing on your ASIN (high priority)
- Category reassignments (medium-high priority)
- Buy Box loss (high priority)
- Suppression events (critical)
SellerSonar’s listing content change alerts let you configure each alert type separately so you get notified about what matters, not everything.
Step 3: Set your notification channels
Email works. But if you’re managing a team or an agency, Slack integration gets the alert in front of the right person faster. SellerSonar supports both, plus webhooks if you want to push alerts into your existing operations workflow.
Set up a dedicated Slack channel for listing alerts. When something comes through, anyone on the team can pick it up immediately, even if you’re not at your desk.
Step 4: Build a response playbook before you need it
This is the step most sellers skip. Knowing about a change is only valuable if you know what to do about it. Before an alert comes in at midnight, document:
- Who owns listing change responses on your team
- Where to submit corrections in Seller Central (Manage Inventory > Edit listing)
- Who escalates to Brand Registry if Seller Central reverts the fix
- How many days you wait before opening a Seller Support case
More on specific response steps in the next section.
📌 From Our Experience: The sellers who resolve listing changes fastest aren’t the ones with the best tools. They’re the ones with a documented response process. When an alert hits at 11 PM on a Friday, there’s no time to figure out the workflow from scratch. The playbook is already ready, the steps are clear, and the fix takes minutes instead of hours.
How to Respond When Your Amazon Listing Changes
You got an alert. The clock is already running. Here’s what to do.
Title or bullet point changed: Go to Seller Central, open Manage Inventory, find the affected ASIN, and click Edit. Update the title or bullets to your correct version and save.
Check back in 24-48 hours to confirm the change held. If Amazon reverts it again, that’s a sign you’re fighting a data conflict from another source, whether a flat file submission, a Vendor Central entry, or a Brand Registry contributor. Open a case with Seller Support and specify that you’re experiencing repeated unauthorized changes to the listing content. Document everything with timestamps from your monitoring tool.
For a detailed walkthrough of the escalation path, eComEngine’s guide to unauthorized listing changes covers the support case and Brand Registry escalation steps in full.
Image changed or removed: Submit your compliant replacement images through Manage Inventory. If Amazon flagged and removed the image (rather than just replacing it), you’ll typically see a suppression reason in the listing edit view specifying what requirement wasn’t met.
If the image was overwritten by another seller’s flat file submission, you have grounds to escalate through Brand Registry. Document the change with before/after screenshots from your monitoring history.
Category changed: These are harder to fix through standard listing editing. Open a Seller Support case and specifically request a category reassignment, providing the correct category path and any supporting product documentation relevant to your category.
If Amazon keeps reverting your corrections: This usually means there’s a data source with more authority than your manual edits overwriting your changes. Work through Brand Registry escalation. Provide evidence of the original listing, your brand ownership, and the unauthorized changes. Request a content lock or an authorized submission flag on the listing.
For hijacking alerts specifically, when a new unauthorized seller appears on your ASIN, the first step is a direct message through Seller Central. Keep it short: registered trademark, not authorized, 24 hours to remove the listing before a formal Brand Registry complaint is filed. Most opportunistic hijackers disappear at that point. The ones who don’t escalate to Brand Registry’s IP violation reporting tool.

Amazon Listing Monitoring Software: What to Look For
Rachel runs a private label brand with 140 ASINs across three categories. She spent six months using a free monitoring tool that checked her listings once every 24 hours. When she finally switched to a tool with hourly checks, the first week of alerts surfaced three undetected title changes and a category reassignment she estimates had been sitting there for at least two weeks.
Two weeks of a wrong category. That’s two weeks of missing browse node traffic she’ll never recover.
That’s the difference alert frequency makes. Daily checks versus hourly checks is the difference between a 24-hour blind spot and a one-hour blind spot. One of those is fixable before damage compounds. The other is how sellers end up running ranking recovery campaigns they didn’t budget for.
Here’s what actually matters when choosing Amazon listing monitoring software:
Alert frequency. How often does the tool check your listings? Hourly is the minimum standard for professional monitoring. Daily checks are not monitoring. They’re a delayed recap of what already went wrong.
Coverage depth. Does the tool monitor title, bullets, images, category, backend keywords, Buy Box, suppression, badges, and new sellers? Or just title and price? Partial tools leave gaps in exactly the wrong places.
No Seller Central credentials required. Some monitoring tools require you to connect your account via API. That’s a privacy risk and a potential single point of failure if Amazon changes API access rules.
SellerSonar monitors public listing data. You can add any ASIN, including competitor ASINs, without connecting your Seller Central account. Your credentials stay yours.
Alert customization. You need to configure which changes trigger alerts and at what thresholds. A tool that pings you for every minor price fluctuation trains you to ignore alerts. That’s the opposite of protection.
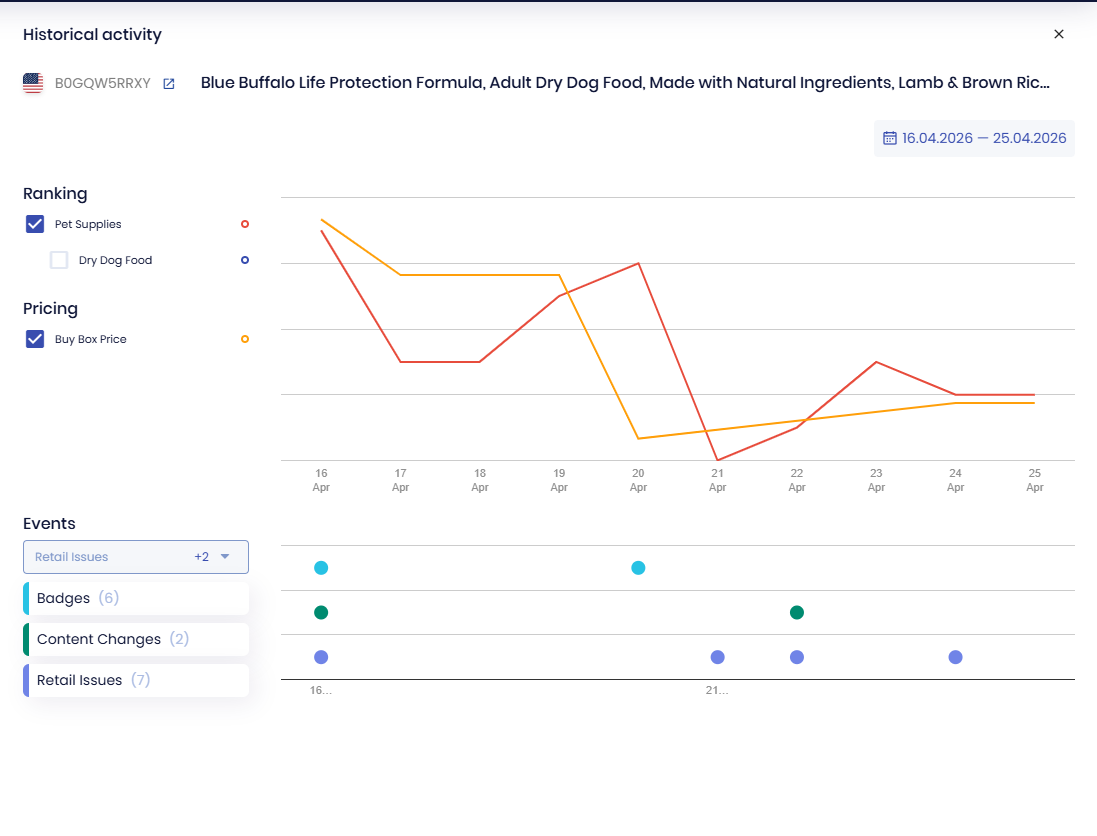
Change history. When did the title change? What did it say before? What does it say now? Your monitoring tool needs to store historical snapshots so you have documentation if you need to escalate with Amazon or Brand Registry.
Baseline audit before you start. Before you can monitor for changes, you need to know what “correct” looks like. A free Amazon listing analyzer gives you that baseline, scoring your current titles, images, bullets, and A+ content against Amazon best practices so you know what you’re protecting. SellerSonar’s free listing quality checker takes under a minute per ASIN and flags gaps you might not know exist before any change happens.
For the broader protection strategy that Amazon product monitoring fits into, including Brand Registry setup, Transparency program enrollment, and escalation paths for persistent issues, see the complete Amazon brand protection guide.
Conclusion
Amazon listing monitoring is not optional at scale. It’s the detection layer between what’s actually happening to your listings and what you know about your listings. Without it, there’s always a gap, and that gap costs you time, rankings, and revenue before you even realize something went wrong.
From what we see with sellers who implement proper Amazon listing monitoring: the first week of automated alerts almost always surfaces at least one issue they didn’t know existed. A title change from last month. A category that’s been wrong for weeks. A suppression event that partially resolved itself but left a residual ranking hit that’s been dragging conversions ever since. The gap between “I check my listings” and “I know my listings” is wider than most sellers expect.
Closing that gap is straightforward:
1. Start monitoring your top ASINs today
2. Configure alerts for the changes that cost you most (title, images, new sellers, suppression)
3. Build a response playbook before you need it
4. Check your monitoring history weekly even when no urgent alerts come in
Final Expert Recommendations: Based on monitoring data across thousands of Amazon ASINs, the single highest-impact change most sellers can make is reducing their detection window. Moving from daily manual checks to hourly automated monitoring typically cuts the time between when a change occurs and when it gets corrected from 24-72 hours down to 1-4 hours. At scale, that time difference is the gap between a quick revert and a ranking recovery campaign.
Start a free 14-day trial and find out what’s actually changing on your listings right now. Most sellers are surprised by what’s already there.